Lets talk about the time I made a recipe for my sister-in-law after my nephew was born. About how I barely could remember the recipe and how it turned out GREAT, but I didn't take photos. Yep, that would be me. But, based on how AWESOME my recipes can be (note the word choice there, CAN BE), I think you should trust me on this one... it is REALLY easy and TASTY!
What you'll need:
Pork (I just got the mini roast from Wal-Mart, nothing fancy)
3 Cans Coke Cola
1 1/4 Cup Brown Sugar
1/4 C Water
1 Can Green Chile's
1 Can Red Enchilada Sauce
Step One: The day before, prepare your marinade. You'll use 1 1/2 cans coke and 1/4 cup brown sugar. Let soak overnight.
Step Two: The next day drain and place in the crock pot and place in 1/4 cup water and 1/2 can coke. Let cook on low for 8 hours (or on high for 4 hours).
Step Three: Once cooked, drain your crock pot, shred the pork (which if cooked completely will be ridiculously easy, I used tongs and just tore it apart) and add the green chilies and enchilada sauce and the rest of the brown sugar and a 1/2 can coke. Cook on high for 2 hours.
Step Three and a half: If you're making burritos, then prep your rice. Use chicken broth instead of water (use white rice). Prep your lettuce - romaine or spinach, not iceberg, and cut tomatoes.
Step Four: Serve and enjoy your meal!

Friday, August 31, 2012
Wednesday, August 29, 2012
Guest Post: Interiors by Kenz
Today's guest post is brought to you by a dear friend of mine, Mekenzie. We've known each other for years and I love her to death. She's a doll and I'm sure that if you aren't already a fan of her blog, you'll know before this post is done why I am a VERY BIG fan of her work! Check out this wonderful post she's set up for today, then go check out her blog so see her beautiful home and other projects!
Also, she's giving away an AWESOME prize at her blog, check it out!
Who am I, you ask? Well I'm the voice behind Interiors By Kenz, a fun little DIY blog. I am an ambitious DIY-er with some pretty outrageous projects. I don't have one pair of sweat pants that isn't covered in paint. My motto 'round these parts is DIY BRAVERY! Extreme humiliation shouldn't keep us from creating beautiful things. (See more of my real life story here!)


Also, she's giving away an AWESOME prize at her blog, check it out!
~*~*~
Hi TWL readers! My name is Mekenzie, and I am SO excited to be guest posting over here! Dani and I go way back to elementary school, where we would Modge Podge crafts and eat glue together. Okay, I don't actually remember if we ate glue (possibly a side effect of eating glue?), but Dani has been a friend of mine for a long time, and I LOVE reading This Workman Life. She always has great recipes, great tips & tricks, and the best mommy advice.
Who am I, you ask? Well I'm the voice behind Interiors By Kenz, a fun little DIY blog. I am an ambitious DIY-er with some pretty outrageous projects. I don't have one pair of sweat pants that isn't covered in paint. My motto 'round these parts is DIY BRAVERY! Extreme humiliation shouldn't keep us from creating beautiful things. (See more of my real life story here!)

Today I am going to share with you one of the best things I have learned as a DIYer: HOW TO PAINT FURNITURE WITHOUT SANDING! Say what?! It's true. I am lazy, and I don't have a lot of time to spend on projects. Discovering this trick was like finding a pot of gold.
When I got married, my mum gave me this hutch, which was built by my great grandpa, to put my piano music in. It was incredibly meaningful, but so atrocious looking.
When I got married, my mum gave me this hutch, which was built by my great grandpa, to put my piano music in. It was incredibly meaningful, but so atrocious looking.

I removed all the hardware, and took out the drawers. I taped off where the drawer fronts ended, so there wouldn't be unsightly paint drips. Then it was prime time! I used a Rustoleum brand of primer called "Cover-Stain: Oil Based Primer." It kills stain and sealer, which means no sanding. YES! But be prepared, Something this powerful comes with a price. I hope you have windows (If you don't, what kind of weird house are you living in??) The smell of this stuff is RANK STANK! Also, it is incredibly sticky. Just know that you will need to throw away any and all tools used during the priming process. If at all possible, do this outside.

Once the primer has dried (over night will do), you are good to paint. 2 coats is standard. But that goes by so quickly. In a couple of hours when your paint has dried, you have 2 options:
-You can either seal it and be done with it
-You can either seal it and be done with it
-You can glaze it for an antiqued look, then seal it.

For the sake of this post, I will teach you how to glaze. IT IS SO EASY! And it will make all the details POP! I used Valspar "Faux-Collection Tintable Glaze. (Make sure to take it to the paint counter at the hardware store and have them tint it the color you want). I used black glaze. You brush on a coat of glaze, then wipe it off with a dry rag. DO NOT LET IT DRY. Wipe it while it's wet, and it will leave the right amount in the details and cracks, etc. If you want your glaze darker, you can go back and apply more coats. I would recommend glazing sections at a time, instead of brushing an all over coat on, then going and wiping it off.

Once the glaze has dried, let's seal it up with a solid coat of Poly. My favorite sealer is Minwax Water-Based Polycrylic, Clear Semi Gloss. Slowly brush a coat of the poly on, making sure there are no drips. Let it dry over night.

When it's dry, if you see any bumps or bubbles, you can lightly sand with 220 grit sandpaper. Put your hardware back on, put in place and enjoy!

I hope this gets your gears turning thinking of things you can paint! And when you do, let me know! I would love to feature your projects on my blog. Thanks so much Dani for letting me stop by today! And you all have an open invitation to stop by Interiors by Kenz anytime.
---
Uh, Kenz is giving away a $50 (YEAH, FIFTY) dollar gift card to Target. Go check out her giveaway and see if you're the lucky one to win it!
---
Uh, Kenz is giving away a $50 (YEAH, FIFTY) dollar gift card to Target. Go check out her giveaway and see if you're the lucky one to win it!
Monday, August 27, 2012
Crockpot Honey Chicken
This is a Pinterest recipe, although I wasn't the biggest fan on it. Bubba keeps saying to give it another try to make sure it wasn't that great... I think he secretly liked it.

What you'll need:
Chicken Breasts
1/2 cup honey
1/4 cup soy sauce
1/8 cup ketchup
Salt and Pepper
Optional - (aka, I didn't use it),
1 tbsp veggie oil
1 tbsp garlic salt
Here's how:
Salt and Pepper the chicken, then place in crockpot with all your ingredients stirred. Cook on low for 6 hours. We weren't home to stir it all day, so I'm sure thats what we did wrong.. or maybe not. I wasn't a fan of it plain, however, I shredded it and put the chicken on a roll and it was much better that way.
Saturday, August 25, 2012
Our Week in Photos

First Row: My handsome husband. He loves playing video games, and this week decided Brayden needed to join him. Silly, both of them. Speaking of silly, my kid likes the sides of the play pen more than the middle.
Middle row, it's homework time! I couldn't fit the sleeping photo in one box, and it worked out with the two boxes, he SACKED out on me this week and was snoring. Adorable.
Bottom Row: Aunt Jo Anne came to visit from Houston, Texas. We had dinner at my Aunt Suzanne's, and Brayden got to love and be loved on by Grandpa Hank and Grandma Di.
Hope you've had an awesome week!
Friday, August 24, 2012
Bacon Wrapped Chicken
 This is a recipe that I found off of Pinterest, and even online this meal isn't very pretty. That being said, it is TASTY! Bubba and I have come up with some ideas on how to transform the recipe into our own, and if it works out, you'll see our alterations being blogged about!
 What you'll need:
1 package of chicken breasts
1 package of bacon
1 cup sour cream
2 cans cream of mushroom soup
1/2 cup flour
 Turn on crockpot to low and mix the sour cream, soups and flour, stir well with a whisk.
Make sure bacon and chicken are thawed and then wrap the bacon around the chicken. I considered using toothpicks to hold the bacon, but after pressing down firmly, it almost adhered itself.
Place chicken in crockpot and cook for 8 hours on low. Once done, you can eat it plain (like Bubba and I did, pictured above) or over rice, potatoes, or pasta.
Tuesday, August 21, 2012
Posting Schedule Updates!
Hey everyone!
I wanted to send an update of the posting schedule as school starts tomorrow!
Usually the posting schedule was Manicure and Makeup Monday, Tutorial Tuesday, Wardrobe Wednesday, Foodie Friday and Family photos of the weekends. We are REALLY changing that up!
Now, I am sticking mostly to food posts and recipes while in school. I have opened up Wednesdays for guest posting and have some fantastic guest posters already lined up to share their stuff with you! If you're interested in guest posting you'll need to Contact Me and we can get something set up!
The weekends will still be full of photos from our adventures and our week.
I hope you're having a fantastic week!
Happy 51st Birthday - A Gift Basket Idea

Someone once told me, that after 50 it all goes downhill. Personally, I believe the same applies for gifts given and received after someone turns 50, they're all kinda...well not spectacular. That's why I really, really wanted to give a gift that would be used, as well as something they'd like to get.
That being said, who DOESN'T like getting their favorite treats?!
That being said, who DOESN'T like getting their favorite treats?!
This ended up working out really well. The basket could be used to keep the goodies near the couch or recliner (at least, that's just my opinion!), and I found almost all of the goodies for the recipient that I wanted to. The only one I couldn't find were Circus Peanuts - bummer!
We gave this to my Father-In-Law for his birthday, and he seemed to like it. Now I'm going to HAVE to find Circus Peanuts for Christmas for him!
Monday, August 20, 2012
Family Photos


He also takes REALLY good self portraits of the two of us, which I have come to respect.

I am so blessed to have a happy, healthy little boy. Brayden is such a blessing to me and our family and teaches me new things every day. He teaches me about happiness, about excitement, about forgiveness, and the little man doesn't even realize it. He's also a wild man, and as much as I worry about him (and his future hyperactivity when he is fully mobile) I know that we are all going to have so many adventures together as a family.
 I am so thankful that I am as blessed as I am to have the beautiful family that I do. Its a small family, and someday we do hope to grow, but until then we are completely content and happy with our blessings and our ability to love each other like we get to.
Thanks for taking these photos mom, I know Brayden was a wiggle-butt and a pain to take photos of, but they turned out fantastic and I love them. Now, to get them printed and framed and placed in our home!
Sunday, August 19, 2012
Our Week in Photos!

Its been a crazy week here, but here's some photos!
Brayden wore those cute overalls to church today- aren't they adorable? Aunt Carebear gave the outfit to him, and he looks so cute!
Top to bottom, earlier this week Brayden and I played on the computer. His faces were so cute!
I scared daddy while he was cleaning the bathroom... and his "Im going to kill you face" makes me laugh!
Brayden. Ahh. I love that little man.
I'm posing in my JunieBlake skirt - I won a $30 gift card and ordered it on Tuesday, it was here by Friday. I cannot even begin to tell you how thrilled I was with their product and customer service!
Want to see it?

I LOVE IT! I paired it with a grey top and white tank and it looked great (and was super comfortable too!)
What did you do this week?
German Plum Cake
Oma handed me a sack of plums last week and told me to use them before they went bad. I'm a BIG fan of receiving fresh fruit from gardens, but this was a grocery bag full! I racked my brain and finally gave in, I had no choice, I had to make her traditional German Plum Cake.
This recipe was a BEAST to make, not because it is hard, but because the cookbook I pulled it out of (the German Speaking Ward cookbook) didn't have the full recipe in one place. I had to find one, then skip to another, then to another.
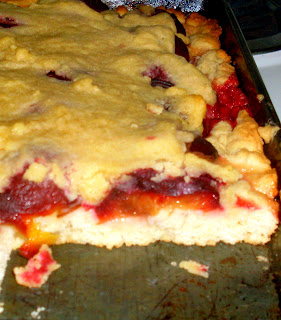 Also, I don't know WHAT I did wrong with the Streussel (it just doesn't look right), but it tasted all the same, so we really didn't care, its still tasty!
Step One: Make your dough
Your dough has a name. It is called "Cream Cheese Oil Batter". Doesn't it just scream disgusting and tasty all at once? Here's what you'll need:
3 cups and 3 t flour
8 oz cream cheese
1 cup sugar
3 t oil
4 t baking powder
1 t butter
2 eggs
Mix all together, then let sit for 30 minutes. Once your 30 minutes are up, place in a well greased cookie sheet and roll well. (I used my fingers, but its because we couldn't find our rolling pin. Use a rolling pin.) Prick dough with a fork to ventilate it and prevent the bubbles!

Step Two: Cut the plums. I cut them in half, but you could have done them thinner. Place them on the dough "like shingles on the roof".
Now, you can toss this in the oven and cook at 350 for 30 minutes... OR you could rock the Streussel like I did and go onto Step three...
Step Three make your Streussel. You'll need,
2 cups flour
9 oz butter
1 cup and 8 t sugar
1 t vanilla
"Warm your butter and mix with all the other ingredients." Well, I took that as "make the butter squishy but not melted, so toss it in the microwave for 25 seconds." and I did just that. I mixed it well, then went to "sprinkle" it on my cake. Let me tell you a secret... theres no sprinkling it. So I took my spoonchula and spread it. It worked.
Once your done baking it, let sit for some time. The juices from the plums will escape and eek into every part of the cake it can, making it that much better. Enjoy your butt-ugly delicious cake!
This recipe was a BEAST to make, not because it is hard, but because the cookbook I pulled it out of (the German Speaking Ward cookbook) didn't have the full recipe in one place. I had to find one, then skip to another, then to another.

Step One: Make your dough
Your dough has a name. It is called "Cream Cheese Oil Batter". Doesn't it just scream disgusting and tasty all at once? Here's what you'll need:
3 cups and 3 t flour
8 oz cream cheese
1 cup sugar
3 t oil
4 t baking powder
1 t butter
2 eggs
Mix all together, then let sit for 30 minutes. Once your 30 minutes are up, place in a well greased cookie sheet and roll well. (I used my fingers, but its because we couldn't find our rolling pin. Use a rolling pin.) Prick dough with a fork to ventilate it and prevent the bubbles!

Step Two: Cut the plums. I cut them in half, but you could have done them thinner. Place them on the dough "like shingles on the roof".
Now, you can toss this in the oven and cook at 350 for 30 minutes... OR you could rock the Streussel like I did and go onto Step three...
Step Three make your Streussel. You'll need,
2 cups flour
9 oz butter
1 cup and 8 t sugar
1 t vanilla
"Warm your butter and mix with all the other ingredients." Well, I took that as "make the butter squishy but not melted, so toss it in the microwave for 25 seconds." and I did just that. I mixed it well, then went to "sprinkle" it on my cake. Let me tell you a secret... theres no sprinkling it. So I took my spoonchula and spread it. It worked.
Once your done baking it, let sit for some time. The juices from the plums will escape and eek into every part of the cake it can, making it that much better. Enjoy your butt-ugly delicious cake!
Saturday, August 18, 2012
Friday, August 17, 2012
Iced Coffee in a Jar
 I've used this recipe multiple times and LOVE IT, it's super easy and I make them in advance and have them whenever I need them - work, school, help waking up on weekends, you name it. It tastes like a mocha frappuchino and is easy to make, and easy to prep. Here's how.
The prep, what you'll need:
Mason Jars (as many as you'd like) and lids
3/4 c milk
3/4 c coffee
2 tablespoons chocolate syrup
2 tablespoons sugar
1 tablespoon coffee creamer (optional)
 Brew coffee, mix your ingredients and place in fridge. Once you're ready to drink, pull them out, shake and add ice cubes! To drink out of the jar, replace the metal on the lid with a cupcake liner and stab a straw through. I've just been transferring to a coffee mug, because it holds its cool longer.
Sip, and enjoy!
Back to School - Day Six
If you've missed it,
Day One, Day Two, Day Three, Day Four, Day Five
Today we are going to cover a topic I've been REALLY looking forward to covering - how to stay awake while studying! After working night shifts for a few years, working after school and going to college AFTER working all day I feel that I am definitely qualified to talk about this topic and share my tricks! Some of these aren't totally healthy, and I'll admit it - but if you've got tricks to share, please do so below!
All-Natural Tricks to Try
Energy Drink Fixes and Tricks
Coffee Mixes and Recipes
Day One, Day Two, Day Three, Day Four, Day Five
Today we are going to cover a topic I've been REALLY looking forward to covering - how to stay awake while studying! After working night shifts for a few years, working after school and going to college AFTER working all day I feel that I am definitely qualified to talk about this topic and share my tricks! Some of these aren't totally healthy, and I'll admit it - but if you've got tricks to share, please do so below!
All-Natural Tricks to Try
- When feeling exhausted, get up and dance - crazily. The wilder, the better. For a great playlist full of upbeat music, check out this post.
- If you're struggling to focus, take a shower. Focus on the hot water, shake out your muscles and put on some comfy clothes, you should be able to focus better afterwards.
- Focus on doing some yoga in your chair or at your desk for a moment. Here's a how-to video.
Energy Drink Fixes and Tricks
- Dilute an energy drink with ice chips and sip on it slowly. You're going to drink the crap anyways, but why not drink it in smaller amounts?
- For a mega-boost (done this, love it, don't encourage it) add a scoop of vanilla ice cream to an energy drink in a glass and let it dissolve by stirring it.
Coffee Mixes and Recipes
- Here's a mock Frappuchino Recipe: (tried it, loved it, sitting in my fridge!)
1 1/2 cup ice
3/4 cup coffee
3/4 cup milk
2 tablespoons sugar
2 tablespoons chocolate syrup
Blend well and enjoy! For a more "coffee house" feel, add more chocolate syrup and ice! I stored mine in mason jars because they're really easy to shake and seal. - For other coffee recipes, I used Pinterest and searched an entire list - it's a long one!
Thursday, August 16, 2012
Back to School Week - Day Five
If you missed it...
Day One, Day Two, Day Three, Day Four,
Today I'd like to do a short Back To School Post because they've all been really long so far. Today's challenge; decide what you want, write it down, and post it where you can see it EVERY. DAY.
Studies have shown that focusing on a long term goal on a daily basis helps achieve that goal - so lets go out there and do it!
If you'll excuse me, I've got a goal to write down.
Wednesday, August 15, 2012
Back to School - Day Four
If you've missed it,
Day One, Day Two, Day Three.
Today's Challenge is create an easy style for class - today we are focusing on makeup and hairstyles!
Some of my inspiration comes from here (for hair),here and here (for makeup).
 Hair: Keeping your hair up and into a cute updo keeps your hair out of your face, away to prevent distraction (if my hair is down I will play with it), and hair can sometimes cause acne, so keeping it up prevents future breakouts!
Check out the links above for style ideas, how-to's from this blog and so many other ideas!
Makeup: The trick is the same as what you get told for work, simple, easy, and light. There are lots of ideas above, and for me, I ALWAYS refer to white/base and a light pink color for my eyes, light mascara and liner and chapstick. Pack the basics in your bag, and don't go over the top. Not only will you distract yourself with trying to fix your makeup during the heat of summer/early fall or after the icy winds of winter, but you'll distract others...and not in a cute way.
How you dress for class is very important when it comes down to college. You want to make sure that you are comfortable, feel confident, and don't have any distractions!
Do you have any tips for college styles when it comes to hair and makeup?
Tuesday, August 14, 2012
Back to School - Day Three
If you've missed this week so far,
Day One & Day Two
Day Three:
Today's challenge is to organize your desk space! I tackled this challenge a few weeks ago, with my blog post about it here.
 After having the new desk space, I have to say that I absolutely love it and the clipboards are working out so well for blogging and for prepping for school! I also love that I have my space open and clean so that I can use my laptop, my books, everything.
Also, it matches my living room decor - UTES!
For some ideas on desk organization, office decor and the works, check out my Pinterest board here.
 Today's challenge is to also crack open those books and start to read ahead, crack open your highlighters and get ahead of the game with the text. If you're not sure about the material, get some books from the library and begin to at least read about your topic at hand.
If you've been keeping up with all the challenges, then start to listen to all your podcasts and begin to take down some notes. If you have questions shoot them off to the appropriate people and begin working your brain!
The best advice I have ever been told is that the brain is like a muscle. It works best when used in repetition, so start warming up those brain muscles!
What are your best tips for reading ahead? Share below!
Day One & Day Two
Day Three:
Today's challenge is to organize your desk space! I tackled this challenge a few weeks ago, with my blog post about it here.

Also, it matches my living room decor - UTES!
For some ideas on desk organization, office decor and the works, check out my Pinterest board here.
 Today's challenge is to also crack open those books and start to read ahead, crack open your highlighters and get ahead of the game with the text. If you're not sure about the material, get some books from the library and begin to at least read about your topic at hand.
If you've been keeping up with all the challenges, then start to listen to all your podcasts and begin to take down some notes. If you have questions shoot them off to the appropriate people and begin working your brain!
The best advice I have ever been told is that the brain is like a muscle. It works best when used in repetition, so start warming up those brain muscles!
What are your best tips for reading ahead? Share below!
Monday, August 13, 2012
Back to School Week - Day Two
If you missed it,
Day One
Upgrade your Gadgets for School
Upgrading Your Phone: You don't need a new phone to have an upgraded version for back-to-school. Like any item that needs a makeover, overhaul your phone to make it school-friendly.
First thing is first, delete the applications you don't use and erase old information. Do a contact list overhaul. With smart phones, I have found that I have duplicate names in my address book. To avoid this, login to your provider (for Android it'll be Google) and combine your address books.
I always download a new wallpaper, new tunes for notifications and edit my settings as to what notifications I receive. This makes a BIG difference when you're studying, so not every little thing can get set off and distract you.
Android Apps To Download: These are all applications that I have downloaded and use for school, and LOVE!
Upgrading Your Ipod: I LOVE that Itunes has Itunes University as well as so many free podcasts! All you have to do is type in your topic of choice and bask in the multiple topics available to you. I use podcasts and Itunes U as a way of adding to the education I'm getting in the classroom or as a form of continuing education on breaks or during the summers. Not only are they fantastic AND free, but most of the time the Podcasters are FANTASTIC about answering questions asked via podcast or e-mail, so you can always ask them questions!
Also, you can get social media podcasts, so you are listening to the news without wasting HOURS of your life hearing the same information. For this, I always look to TMS (The Morning Stream). It is a longer podcast, podcasted Monday- Thursday, but it is fantastic nonetheless. I get all my social media in 1.5 hours instead of 5.
Upgrade Your Computer: This is something a LOT of us forget about- upgrading our computer. The steps to this are also free and VERY easy to do. Delete all your unneeded files. Clean up Itunes, your photos, files, and unused applications and programs. Delete internet bookmarks you don't need. Like your phone, get new notifications, change notification settings and get a new wallpaper. Defragment your computer. Upgrade your anti-virus software and check for any and all available downloads. Make sure your computer is running smoothly and well.
Day One
Upgrade your Gadgets for School
Upgrading Your Phone: You don't need a new phone to have an upgraded version for back-to-school. Like any item that needs a makeover, overhaul your phone to make it school-friendly.
First thing is first, delete the applications you don't use and erase old information. Do a contact list overhaul. With smart phones, I have found that I have duplicate names in my address book. To avoid this, login to your provider (for Android it'll be Google) and combine your address books.
I always download a new wallpaper, new tunes for notifications and edit my settings as to what notifications I receive. This makes a BIG difference when you're studying, so not every little thing can get set off and distract you.
Android Apps To Download: These are all applications that I have downloaded and use for school, and LOVE!
- Advanced English & Thesaurus
- Mindjet - Mind Mapping application
- Google Translate
- Colornote - sticky note application
- Note Everything - note-to-self application/ notepad
- Tape-A-Talk
Upgrading Your Ipod: I LOVE that Itunes has Itunes University as well as so many free podcasts! All you have to do is type in your topic of choice and bask in the multiple topics available to you. I use podcasts and Itunes U as a way of adding to the education I'm getting in the classroom or as a form of continuing education on breaks or during the summers. Not only are they fantastic AND free, but most of the time the Podcasters are FANTASTIC about answering questions asked via podcast or e-mail, so you can always ask them questions!
Also, you can get social media podcasts, so you are listening to the news without wasting HOURS of your life hearing the same information. For this, I always look to TMS (The Morning Stream). It is a longer podcast, podcasted Monday- Thursday, but it is fantastic nonetheless. I get all my social media in 1.5 hours instead of 5.
Upgrade Your Computer: This is something a LOT of us forget about- upgrading our computer. The steps to this are also free and VERY easy to do. Delete all your unneeded files. Clean up Itunes, your photos, files, and unused applications and programs. Delete internet bookmarks you don't need. Like your phone, get new notifications, change notification settings and get a new wallpaper. Defragment your computer. Upgrade your anti-virus software and check for any and all available downloads. Make sure your computer is running smoothly and well.
Sunday, August 12, 2012
Back to School Week - Day One
It's back to school week here at TWL! After a LOT of time spent on Google I came to realize that there really isn't a lot of work done on prepping to go back to school - namely college. Even worse, there is NO advice online for those returning to college after a break. So, we sat down, took some time and got to making a week's worth of blog posts worth of returning to school!
Day One: Buy your supplies - books, technologies, and other supplies.
For those of you who have no idea what you'll need, here are the basics:
The best bit of advice I can give to ANY college student (new or returning) is to buy your books ahead of time. Your books will be listed online, so you can easily get them purchased. The sooner you buy them, the better, you can purchase the used books in good condition first!
Lastly, get a GOOD backpack or bookbag. My favorite backpack's are OGIO brand. They last FOREVER. My OGIO backpack from high school just bit the dust, putting it at over 6 years old. It lasted through high school, college and technical school. Also, it was used for work. Make sure you get a durable backpack.
That's it for day one of Back to School week. Are there any supplies you can't live without? Share below!
Day One: Buy your supplies - books, technologies, and other supplies.
For those of you who have no idea what you'll need, here are the basics:
 |
| Binders |
- Computer / Laptop
- Binders - Usually one per class
- Notebooks - one per class.
- Pens
- Backpack / Sturdy Bookbag
- Books
 |
| Notebooks |
I always buy one binder per class, and one notebook per class. Since I do have a touch of OCD, I like to take crappy notes in my notebooks and then copy them neatly into my binders. This makes studying really easy and I am able to remember the material better. Also, any extra information I find can be added nicely into the notes, such as online research, book quotes, images, the works.
This semester I splurged and got an index card holder. It was cheap and cute at Wal-Mart and I really need one, since usually my cards end up either getting loose in my bag or getting dirty from all the odds and ends, like loose pens. I also purchased a pack of index cards, and got a LOT more than I will ever need. (The extras are now residing in my recipe box).
Target has Flash Drives with cute covers for dirt cheap ($10 for 16mb's). I got one because you NEVER KNOW. ALWAYS BACK UP YOUR FILES ON A FLASH DRIVE. You never know when your computer will fail. When a document won't print. When you won't have a printer available. If its possible, it WILL happen if you aren't prepared!
Also, you can take it to work and work on your papers there. Not that I do that or anything.
PENS. I'm a pen whore and forget they're in my pockets when I leave work, so I have so many pens I could cry. I always get ink pens now that I'm in college, and never use pencils. I don't know why, but unless its a test, I see no need for a pencil. I didn't purchase pens this year because I have close to a thousand of them. (No joke.)
 |
| Flash Card Holder |
Target has Flash Drives with cute covers for dirt cheap ($10 for 16mb's). I got one because you NEVER KNOW. ALWAYS BACK UP YOUR FILES ON A FLASH DRIVE. You never know when your computer will fail. When a document won't print. When you won't have a printer available. If its possible, it WILL happen if you aren't prepared!
 |
| Books |
Also, you can take it to work and work on your papers there. Not that I do that or anything.
PENS. I'm a pen whore and forget they're in my pockets when I leave work, so I have so many pens I could cry. I always get ink pens now that I'm in college, and never use pencils. I don't know why, but unless its a test, I see no need for a pencil. I didn't purchase pens this year because I have close to a thousand of them. (No joke.)
Lastly, get a GOOD backpack or bookbag. My favorite backpack's are OGIO brand. They last FOREVER. My OGIO backpack from high school just bit the dust, putting it at over 6 years old. It lasted through high school, college and technical school. Also, it was used for work. Make sure you get a durable backpack.
That's it for day one of Back to School week. Are there any supplies you can't live without? Share below!
Saturday, August 11, 2012
Housewarming Gift
 "Come over to our place on Saturday, we're having a Housewarming Party!"
That was where it all began. Where I had to start thinking of what to get someone that may or may not have everything they need or not. And what do you get someone anyways? When we got married we got 4 toasters, 3 sandwich makers, frying pans up the wazoo and so many plate sets that I could cry. We didn't even register for those things! I didn't want to put them in THAT predicament!

I tossed some lemons inside (they smelled SO GOOD) and took a recipe card and put down my recipe for "best lemonade", then flipped it and taped our note to the front of it. I LOVE the idea of giving a treat and a gift they can use, and this turned out cute too! YAY!
BTW, Congrats on your new home Chet!
Friday, August 10, 2012
Our Week in Photos

Hey guys! It's been a busy week here - how have you guys been? If you're a new follower to the blog- welcome! We're so happy to have you!
Our photos, from left to right
Top: Brayden on his 6th month birthday. A photo of the Copper Mine (taken via film camera).
Middle: Brayden's Trip to the Zoo. First photo, how he measures up to the bears. Middle, our little family. Last one is our happy boy. He was all smiles!
Bottom: Our new residents are REALLY cute as you can see. I got this onesie at Wal-Mart clearance for $1! I LOVE IT! The middle photo is another one I took via film camera.
Hope you've had a fantastic week!
Navajo Fry Bread
This is ridiculously easy to make. Mix, knead, spread, fry and enjoy!

Here's how;
2 1/2 C Flour
2 1/2 Teaspoon Baking Powder
1/2 Teaspoon Salt
"Enough Water to Make a Dough" (About a cup and a half)
To Fry:
Medium to Large Skillet (or Wok)
Cooking Oil (any kind works) or Lard
 Mix, then knead for up to ten minutes. I found that forming small balls, and then kneading them separately helped a LOT. While kneading, pour your oil into a pan (about medium heat) and let heat. Once you have your dough kneaded and using your fingers and hands to pat thin (about pancake size), drop into oil and let fry. Flip, then set aside. I covered mine with honey butter while they sat and dried, making them super delicious.
Notes: After kneading for awhile it begins to feel like pizza dough, use your fingers to spread the dough thinner as if it were a pizza crust for a light and fluffier taste.

Here's how;
2 1/2 C Flour
2 1/2 Teaspoon Baking Powder
1/2 Teaspoon Salt
"Enough Water to Make a Dough" (About a cup and a half)
To Fry:
Medium to Large Skillet (or Wok)
Cooking Oil (any kind works) or Lard

Notes: After kneading for awhile it begins to feel like pizza dough, use your fingers to spread the dough thinner as if it were a pizza crust for a light and fluffier taste.
Wednesday, August 8, 2012
Thank you, Mommy Bloggers.
I'm over at And Here's To You Mrs. Robinson today guest posting about Mommy blogging! Go check it out and send her some love!
Tuesday, August 7, 2012
Brayden - Six Months Old

Brayden.
Today you are six months old.
I wanted to post this blog post exactly when you were born, but we decided to take a walk instead. (For the record, it was 10:30 exactly when you were born).
I wanted to post this blog post exactly when you were born, but we decided to take a walk instead. (For the record, it was 10:30 exactly when you were born).
I cannot believe you are six months old today! I cannot believe how big you are getting, how animated you are, and how big your personality is!
You love music, and sing in the car with me when we drive to Omas in the morning, you love your floor gym piano and giggle when we call you baby Mozart.
You love soccer and will fight everything (including sleep) to watch soccer. You cheer daddy on when he plays and steal the ball when the game is over.
You love green beans, and hate pears. You're the biggest pain to feed, but the food beard on your face afterwards is well worth the laugh.
You refuse to try to crawl, but love to try to walk. You've discovered throwing toys and how to blow raspberries.
I love you kiddo, and am loving having you here and watching you grow!
Love you forever, Mommy and Daddy.
Chicken Asparagus Pasta
This was a very easy dinner to make after a long day of work - just remember to set the chicken out to thaw - I didn't have it completely thawed and cutting it into cubes was a beeotch because of how cold it was! Ah!

Here's what you need:
Pasta - any pasta works
Asparagus
Chicken
Fettuccine Sauce
Parmesan (optional)
How to do it:
Cut your chicken into cubes and cook on the stove top. Sprinkle with seasoned salt as you're cooking. While the chicken cooks, cut Asparagus into small pieces and boil for at least five minutes. Once you're asparagus is cooked, drain and rinse, set aside. Begin cooking your noodles.
Once chicken is cooked, drain any fat or grease from the pan. Add your fettuccine sauce (I only used a half a bottle), your asparagus and mix well. Once noodles are done drain and add some butter to prevent it from sticking to the pan. Stir well, then serve!
Monday, August 6, 2012
Mani-Monday - Angled

These two colors are a part of my fall pallette and I wanted to try them out together and see how they do. Both colors are a part of the ICE collection (available for $1.50 at Wal-Mart). I'm still undecided as to if I love how shiny it is, but I do love how well the colors look together!
How to get the angled effect; place a piece of tape over the nail, then paint! It's really easy and a fun design!
Saturday, August 4, 2012
Our Weekend in Photos
So Yeah.. I didn't make a photo collage (there weren't enough photos), so you all get to enjoy a photo post!
Sometimes you have to pause while cooking and ponder about life. (I'm a dork, what can I say?)

So, you wanna see my TINY kitchen that I'm cooking these awesome meals in?
Its proof you don't need a big kitchen to make good food! (The food I'm cooking in these photos will be up soon!)

Brayden and Daddy at Aunt Monica's wedding! I couldn't take photos of the wedding per the photographers request. Bummer :( It was BEAUTIFUL!

Grandma Terrie and Brayden. He LOVES his grandma!

Oh no, we aren't laughing at our kid while he's crying. Not at all.

Bubba and I finally gave up on a family photo and took a self portrait. Got to give Bubba credit - he took a great photo!

Hope you're having a great week!
Friday, August 3, 2012
Grilled Pizza Sandwiches

When asked the other day, "hun, what's for lunch?" by my husband who was coming home for lunch on his break, I knew I had to make something quick and special. Being sick of making him TV dinners for lunch, I peeked in the fridge and got cooking.
Originally the plan was just grilled cheese...but when I saw the pepperoni, I couldn't help myself.
How to do it: Make a Grilled cheese... and add pepperoni. It's delicious. Trust me.
Thursday, August 2, 2012
15 Tips to a Better Household
There are just some things people keep quiet on, or at least used to, before the age of the internet and sharing all the best tips and tricks. Well, today I am going to share some of the best household tips and tricks that I know!
- Heating a lemon thoroughly before squeezing it will allow you to get nearly double the quantity of juice.
- After frosting a cake, a knife dipped in hot water and smoothed over the frosting will give that professional gloss.
- If a bit of egg yolk gets into your egg whites, wet a cloth with cold water, touch the yolk and it will adhere to the cloth.
- Melt a package of "Red Hots" in hot water while making red jello to make a fun flavor.
- When you have strong odors on your hands (such as onion or chemicals), use table salt, rub in well and wash well.
- Fresh eggs are VERY difficult to peel when they are hard boiled, go for older eggs.
- Cook bacon in a cold pan and cook over slow heat or dip in flower before frying to prevent shrinkage.
- Wipe your fingernails with vinegar, let them dry, and then apply polish. Your nail polish will last longer.
- Use hot vinegar to wipe paint stains from windows.
- If your garbage disposal is smelling bad, grind half a citrus fruit in it.
- Ink stains on walls can be removed by lemon juice and salt.
- When tying a cord (such as to use on packages), wet it and then tie it tightly. Once it dries it will shrink and fit snugly.
- Perk up old carrots by soaking them overnight in cold water with a pinch of lemon juice.
- Never toss out stale bread - use it for croutons, desserts or other dinner dishes!
- THE BEST STAIN REMOVER/CLEANER: This works on EVERYTHING - walls, carpets, windows, counters, literally everything. 1 part dawn dishsoap (blue), 2 parts hydrogen peroxide, and lots of hot water. It'll take the stains out of anything, freshen up the room and it smells great. We used this one EVERYTHING before we moved and it cleaned the entire apartment and left it smelling great.
| Tip #7 - my husbands favorite! |
Wednesday, August 1, 2012
Frito Casserole
 I made the comment to my Oma the other day about Pinterest. I told her how much I loved it because I was finding TONS of recipes, and even though I wasn't taught how to cook, I was able to cook great meals for my family. Her response: all recipes are old recipes made new by bringing them back.
 She then proceeded to go to her cupboard and pull out about 50 cookbooks, packaged them into grocery bags and gifted them to me. So naturally, I am on a Pinterest recipe break to try the recipes in the cookbooks.
 This recipe was found in a BYU Ward Cookbook. No one in my family attended BYU. No one lived in Provo. We have no idea where it came from, but we have it!
Frito Casserole
 What You'll Need:
1 lb Ground Beef
1 Can Corn
1 Can Black Beans
1 Small Can Tomato Sauce
1 Bag Frito's
How to do it:
Preheat Oven to 250 degrees. In a baking pan, spray cooking spray and then crumble Fritos onto the bottom, creating a layer of chips.
Brown beef in a skillet. Once cooked add tomato sauce and cook for another moment or two. If you opt to season your beef, use seasoned salt or salt and pepper.
Add corn, black beans (after rinsing them well in the can) and shredded cheese, then add entire mixture into baking pan. Add another layer of Frito's, then top with shredded cheese and sliced cheese. Bake for 30 minutes.
Our Week in Photos!

The last few weeks have been crazy busy for everyone, so I've been a slacker on photos and blog posts. Last week we got to celebrate the 24th of July, help some dear friends move (and see our other friends that moved up to SLC!), had a German ward outing and BBQ, and are finally getting settled in the new townhome!
Photos: from top, left to right
Top: Brayden after trying carrots. If Yosemite Sam had a baby...
Our photos from our new decor
Top: Brayden after trying carrots. If Yosemite Sam had a baby...
Our photos from our new decor
Middle: My new desk space, Bubba helping me get the new cord unit installed and the final product!
Bottom: The German ward outing, Oma and Brayden, Bubba and I, and Brayden discovering - and LOVING - leaves!
Subscribe to:
Posts (Atom)